It has been a minute since I’ve posted here about my Blender adventures – there was a long pause after Day 11 of a never-completed 50-day “make something everyday” practice. The truth is, my interests are not singular enough for me to feel satisfaction from doing the same thing everyday – I demand variety and flexibility. To that end, I’ve started documenting a new creative endeavor – VRDreamJournal – with the desire to play with a number of different softwares (including Blender), while thinking in objects, landscapes and architectures. Yes, sometimes the creations are explicitly in VR (either made in or deployed to a headset), but other times, they are a glimpse into a virtual world.
In the latest for this endeavor, I’m picking up the pieces of what I had learned so far in Blender and woooooo, I have forgotten a lot. Good thing I blogged (said someone for the first time ever).
Let’s dive right into what I attempted to do. I’m really interested in adding water or fluid elements into the virtual scenes I’m creating in Blender and there seem to be two ways to go about it (depending on your needs): (1) create a plane with a material to make it look like water, or (2) utilize Blender’s fluid simulation (and yes, with the appropriate materials) to create a volume / mesh that behaves like water.
There might be more ways for those in the know, but this is what I’ve seen so far.
I decided to start with one because it’s really quite accessible (while still giving you a good bit to learn). I began following along with this tutorial here:
I actually didn’t even do the whole tutorial, as I was most focused on the water bit. A few key takeaways for me was the introduction of the Musgrave Texture Node, which seems is a type of fractal noise.
From the website itself, the definition reads:
Musgrave is a type of Fractal Noise. Simple Perlin Noise is generated multiple times with different scaling, and the results are combined in different ways depending on the Musgrave type.
This is quite helpful. Also, what isn’t Perlin noise? Important keywords / parameters to know:
Dimension: this controls the intensity of the different instances of noise – large values REDUCE the visibility of smaller details.
Lacunarity: this is the scale of the different instances of noise – scales of each instances are set relative to the previous one. I still need to wrap my head around this one.
Scale and Detail are also quite good, and they are intuitive to what you think they are. How nice.
Importantly, if you switch over to 4D dimensional space, using the W parameter, you can play more holistically with the noise (the definition for this value is as follows: Texture coordinate to evaluate the noise at. I don’t know what that means!).
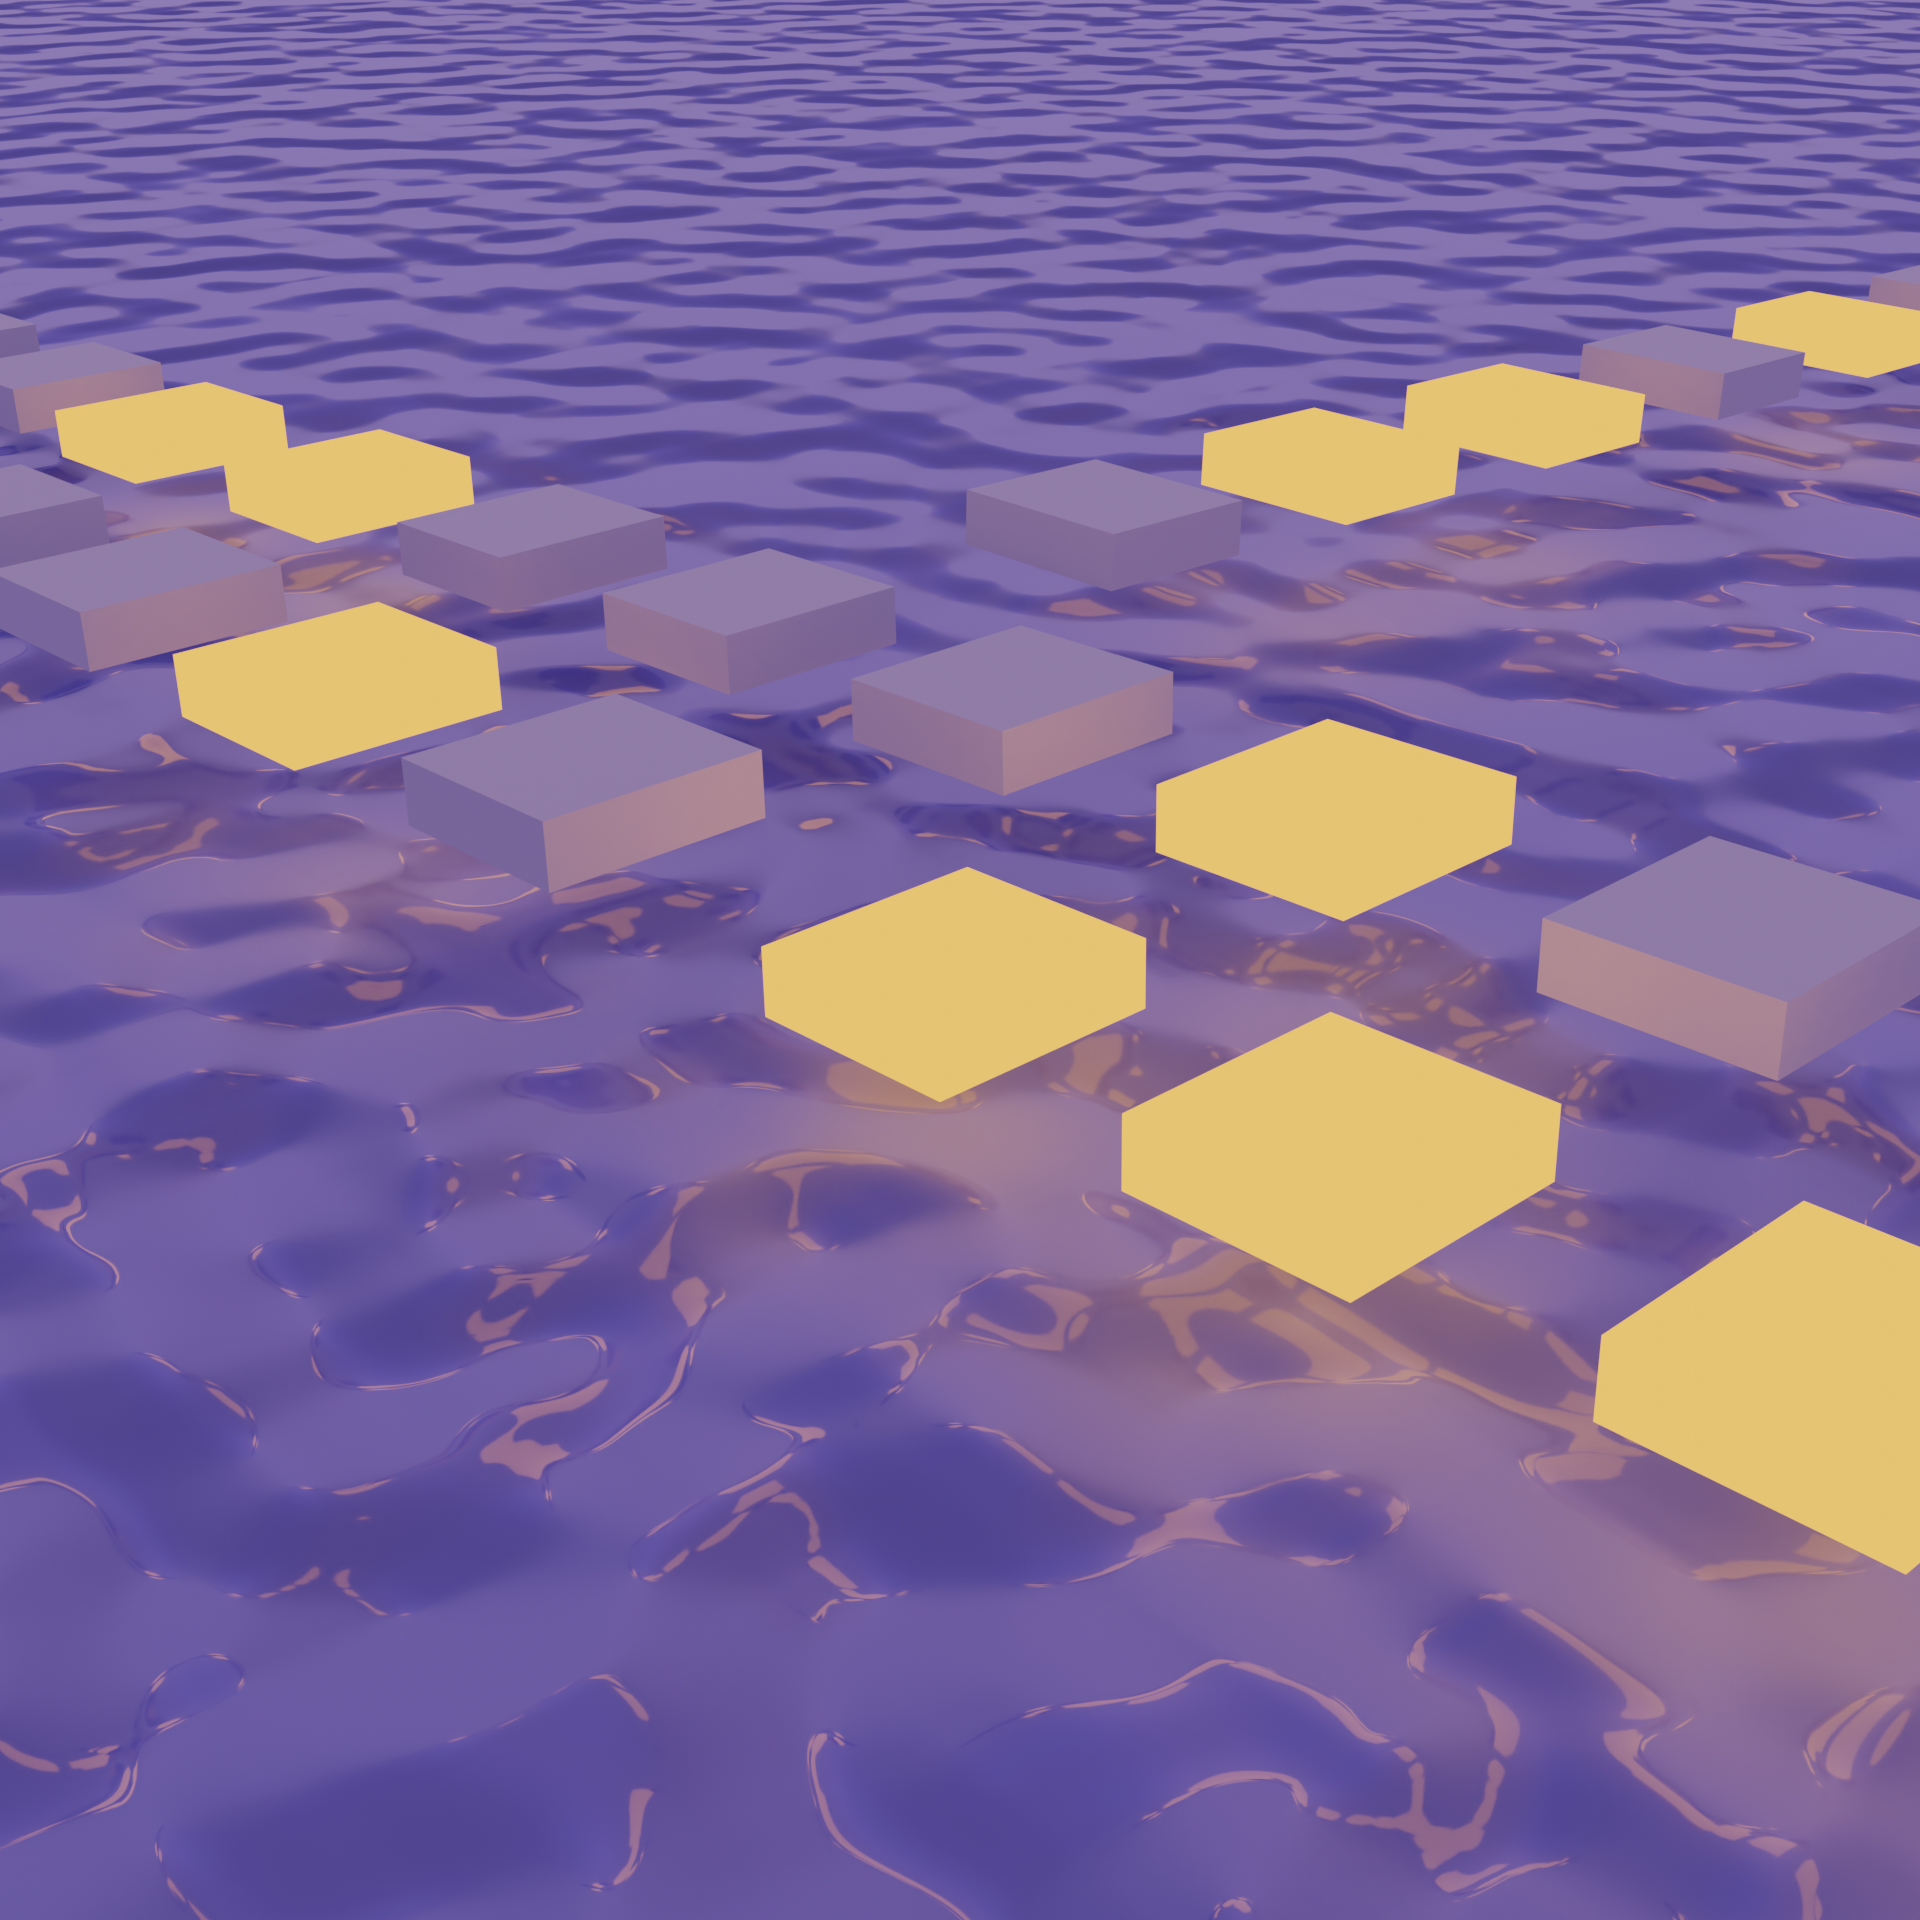
This is what I keyframed to animate my little scene for @vrdreamjournal, a still seen below:
Importantly for future reference: hovering over parameters and hitting i when it changes color will allow you to keyframe that value. A lovely and necessary reminder on how to animate things in Blender.
Things do not quite look as I’d want them to look in the final render, but I am calling it for the purpose of keeping a healthy dose of energy moving through vrdreamjournal – we can keep learning, damnit. (lol it’s the reflections. What is going on.)
I really needed to reset my expectations for how long it takes to render out a decent animation. I had been using a 1080x1080 sized frame for my other instagram posts, but it is very time consuming to render that out at the number samples I wanted (dropped from 128 to 64).
I ended up creating a 5 second video of a 960x960 sized output, and it took 40 minutes(!) to render. I need to keeping figuring out better ways to produce my animations…. And maybe be satisfied with fewer render samples and less noise for when I am editing the scene (the feedback loop was way too slow to be interesting to work with). You will have to follow me on Instagram for the video: @vrdreamjournal.
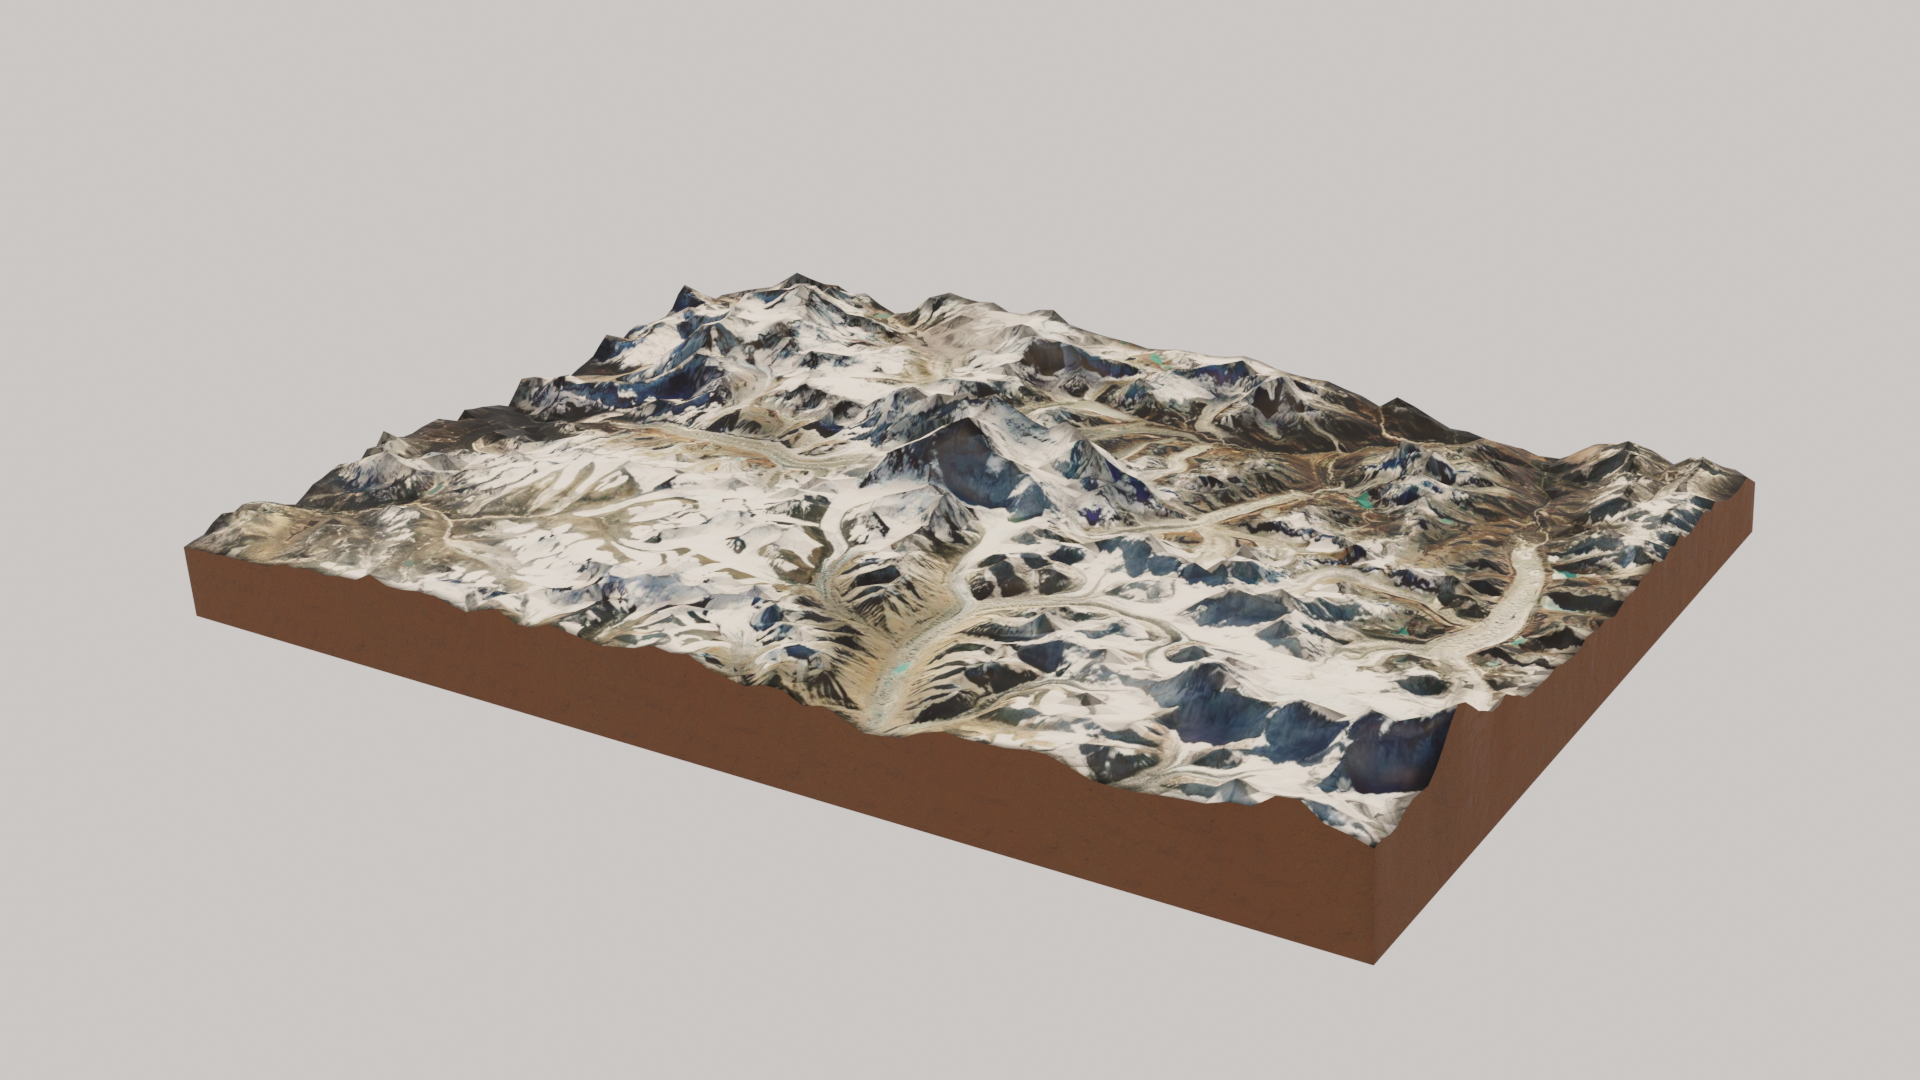
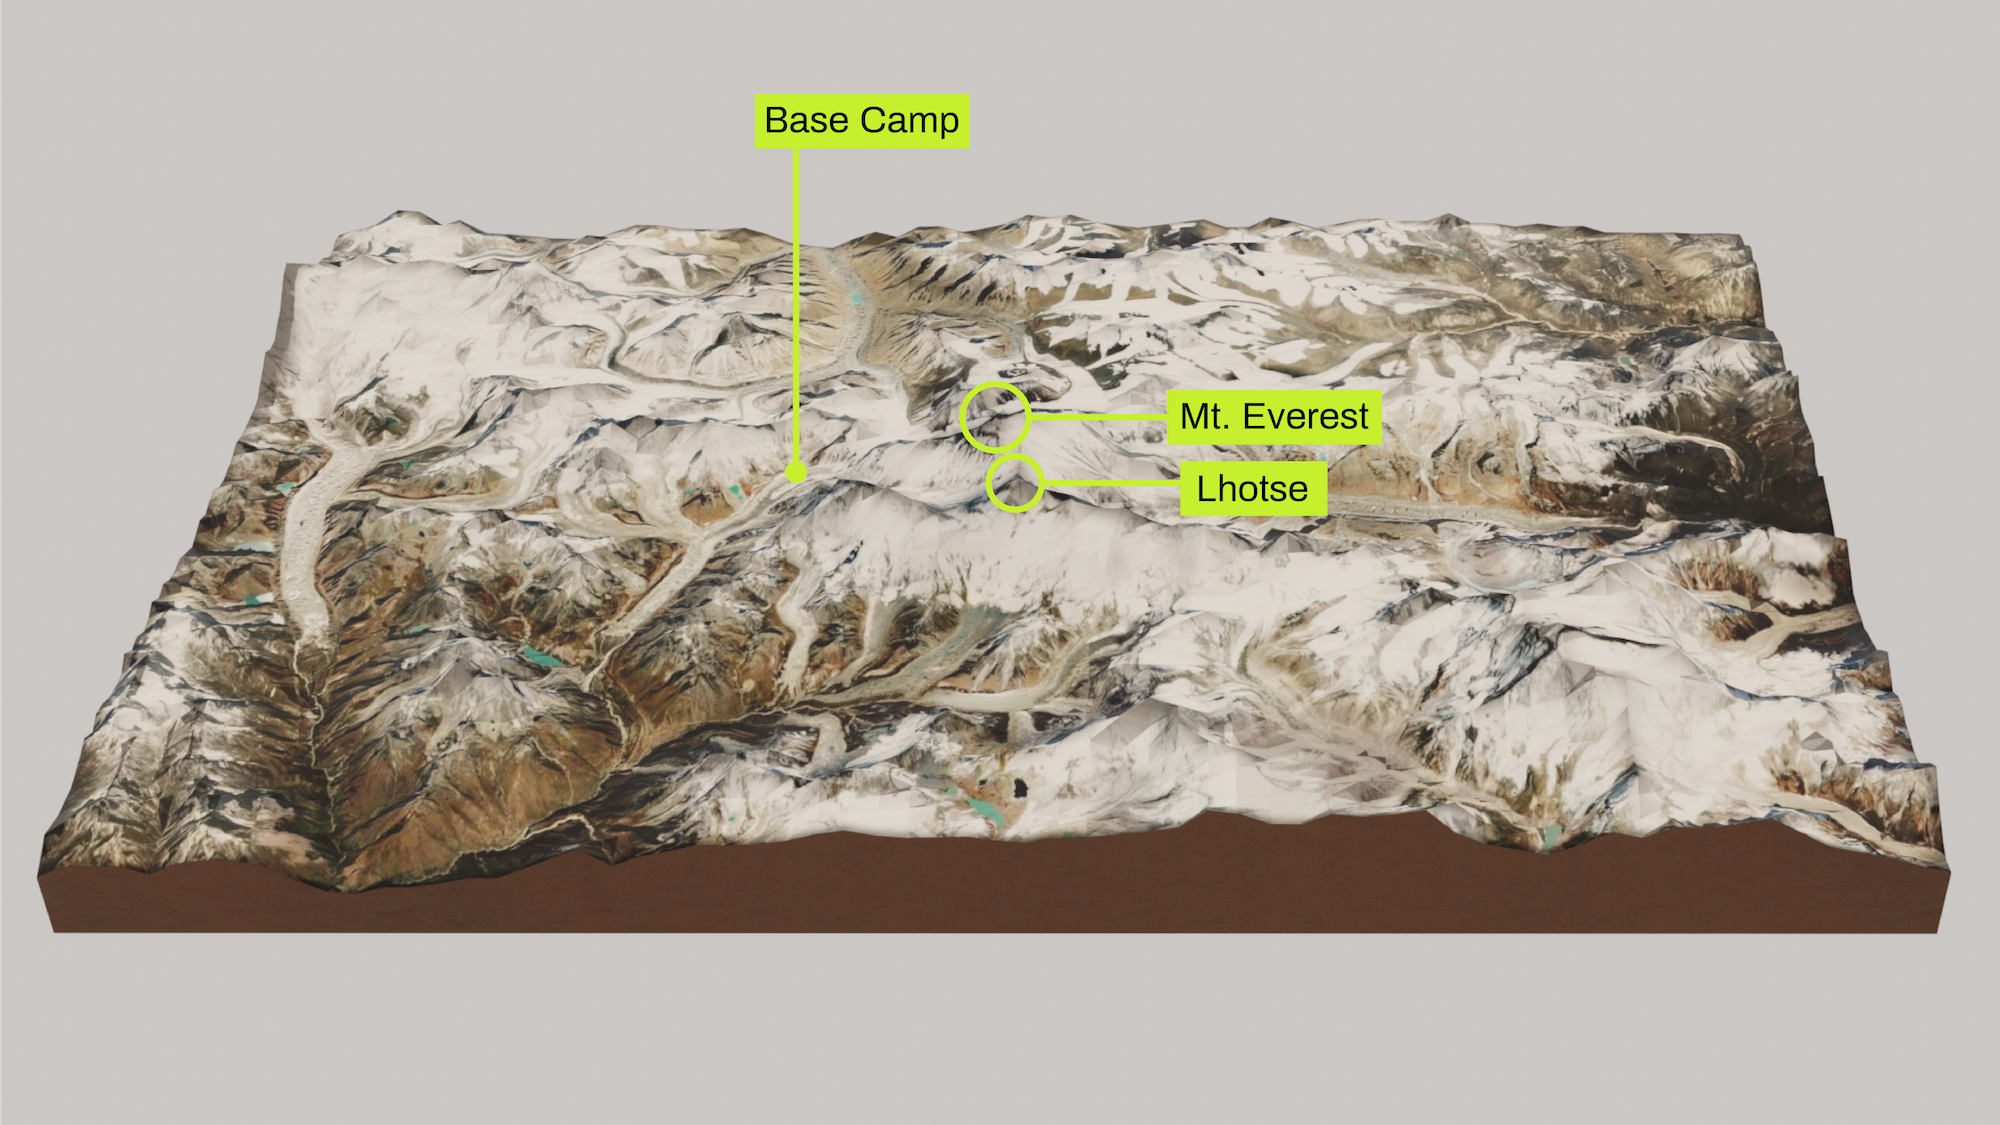
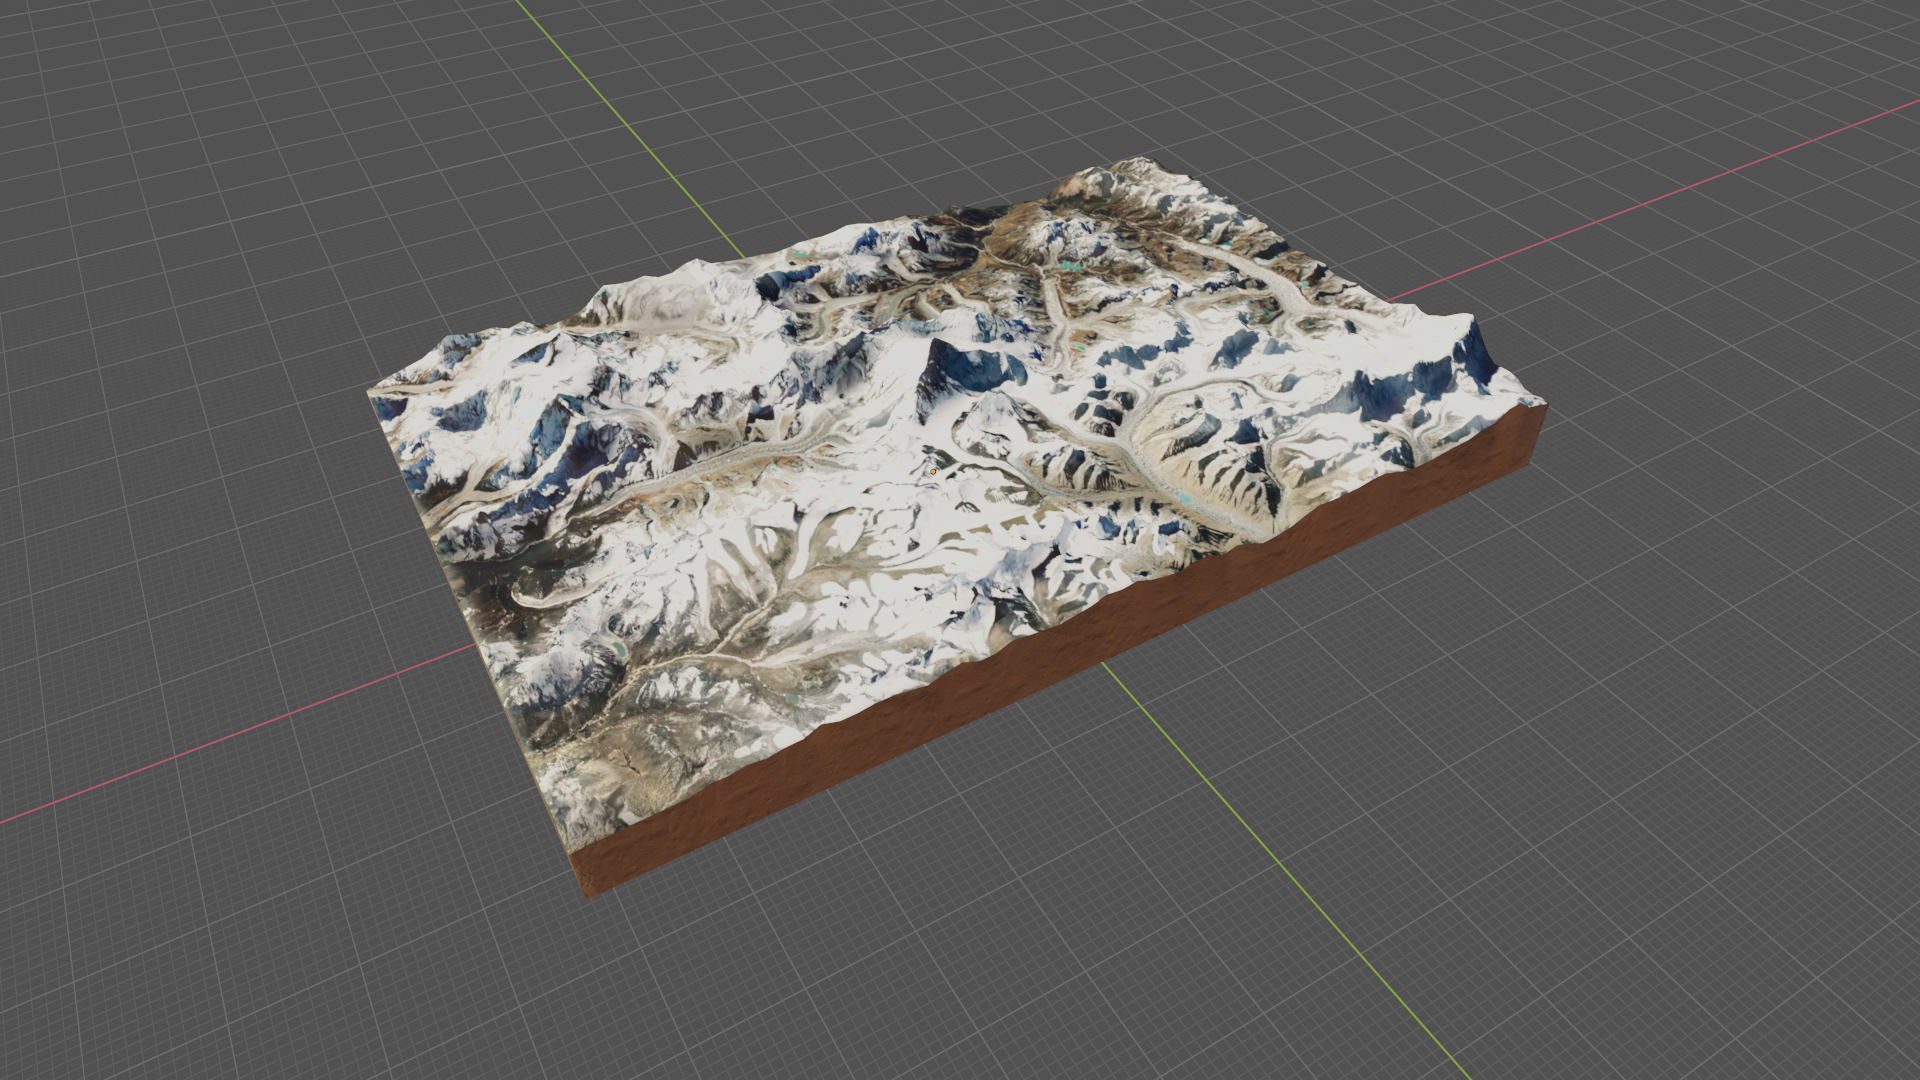
An! actual! render!, thanks to James Hosken. It turned out that my main problem was that the clipping plane of my render camera was much too small to capture the scene the way I wanted. I bumped up the clip end value 1,000,000 m (lol very large mountain range, so…), and this solved my main problem from Thursday. I also needed to change the clip end value of my viewport camera (basically a virtual camera), and then could navigate around as normal to frame the view I wanted. Importantly, I had to have “Camera to view” checked off in View settings. James noted a very helpful keyboard shortcut: hit ~ and then “View Selected” (assuming your active object is your plane/map object). This will bring your selected object to view! And James noted that you could also go into Edit Mode to select specific vertices, and then bring those into view.
Anyway, hire James Hosken for all the things.
This was so fun to make that I’ve captured my notes from the CG Geek tutorial I watched below, so I can quickly references steps and shortcuts in the future.
Adding the GIS data:
Add basemap from GIS menu (GIS -> Web geodata -> Basemap)
g to search for specific location
Line up specific view using your MMB
Once you’re happy with your view, hit e to make the plane w. the mapped texture
Next, GIS -> Web geodata -> Get elevation (SRTM) – elevation data will be added as a Displacement modifier.
Improving the mesh:
In edit mode, subdivide the mesh a few times to bump up the quality.
If it looks jagged, edit the texture in the Displacement modifier by switching Interpolation to on under Sampling.
Then, apply the modifiers!
Adding depth:
In Edit Mode, select all, and hit e to extrude.
Next, hit s + z + 0. This last part is to give that extrusion a flat bottom.
Another important keyboard shortcut: F3 to search! CG Geek has us search for for “Recalculate Normals” at this point.
Adding lighting, background:
Missed this in my first pass, but you can pull in an HDRI as an Environment texture (under World settings), and then, under Render settings, under Film, set it to transparent (this way, you keep the lighting!). Too cool!
Editing our material:
CG Geek then added a Bump node (connecting color output to height, normal to normal on our Principled BSDF node); this added some subtle texture for me! I think the effects could be more pronounced if I were working at a smaller scale.
He also added an Ambient Occlusion node, with a high distance (25ish), directed into a Power node and then to a Multiply node, which could take in two colors as inputs. One of the inputs was still from our satellite image, and the other from that Power node. Both went into Base Color of our Principled BSDF shader.
Adding the dirt material:
Next we created a new material, that we began to edit in Shader editor. We hit Ctrl + Shift + t to import a PBR material (texture we used). Then, we assigned the material to the edges by using face select in Edit Mode, and then alt + clicking to grab that loop cut. Then, we hit u -> Smart UV Project to unwrap the material. CG Geek made some adjustments to scale and coloring of this material, but I kept my edits pretty minimal at this point.
I’m so impressed with how easy BlenderGIS has made it to play with GIS data in Blender, and hope to dig into this more.
This was relatively straightforward to make. I came across a notable keyboard shortcut during the extrusion portion of this modeling exercise. Basically, after I had extruded the plane, I hit s + z + 0 to give the extrusion a flat button.
Realizing it is hella difficult to position my camera for the final render in these scenes – the area I built was just too huge! I’m going to consult my BFF James Hosken, as the resident Blender expert in my life, on this.
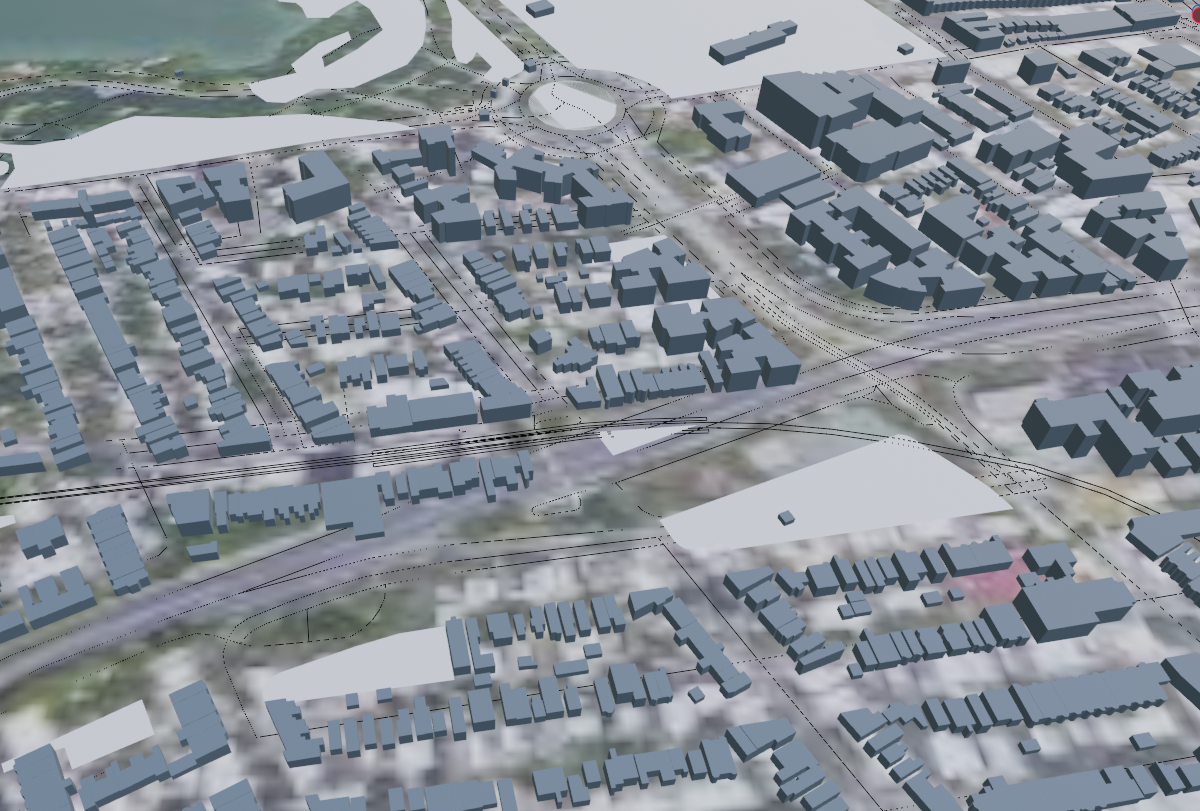
Finally tried my hand at GIS in Blender, using this great add-on called Blender GIS (!!). Pretty fab because of how easy it is to add elevation data, roads, features, buildings. I decided to look at Brooklyn, which may have been a bit too data/building heavy for a start. (Hoping to check out a more interesting terrain tomorrrow).
My attempt at texturing the building rooftops did not go well, so I ended up defaulting to a simpler material. (Again, hoping to give this another try tomorrow, with a less data-intensive location).
My local file also showed a good bit of pixelation, even though I rendered an MPEG-4, with perceptually lossless quality. Will need to debug this later…